DNE XR STUDIO
Our volumetric 4D video application is a novel immersive entertainment medium. DNE XR Studio allows you to transform your device into a holographic projector, and empowers you with the ability to preview 4D volumetric captures in AR, 3D, and XR modes.
GETTING STARTED
Download App
Go to your device’s app store (App Store for iOS or Google Play Store for Android). Search for “DNE XR Studio”. Download and install the “DNE XR Studio” app to get started.
Create Account
Register an account and make sure to grant permission for your device’s camera and microphone to ensure an optimal user experience.
Activate Assets
Using a personalized activation link you will be able to download content onto the app and interact with your volumetric world.

IMPORTANT FEATURES
Calibration
Before waiting for your volumetric content to load, gently move your phone from left to right. This action helps the app scan your environment so it can accurately position the volumetric content correctly within your view.
Loading Asset
You may encounter a situation where an asset hasn’t finished downloading to your device (cloud will appear under asset circle). In such cases, you’ll notice a blue outline of the item along with a buffering symbol. As the item gets closer to complete download, it progressively fills the blue outline with its actual colors. At the bottom of the screen you are able to see the progress your asset downloading.

Sharing ACTIVATION LINKS
Tap the share icon at the top right of your screen to share an activation link with friends and family.

Deleting Assets
To remove an asset from your library, simply tap on the trashcan icon at the top left of your screen and confirm deletion.
Adjusting Assets
Once an asset has loaded, users can modify the hologram’s size, location, and orientation. To reduce the subject’s size, pinch two fingers closer together. To increase its size, pinch two fingers apart. The app also allows you to rotate your subject 360 degrees. Using two fingers rotate or twist your subject left or right to gain different vantage points. If you would like to move your subject into a different place in your environment, simply drag the subject in any direction with the use of your finger.
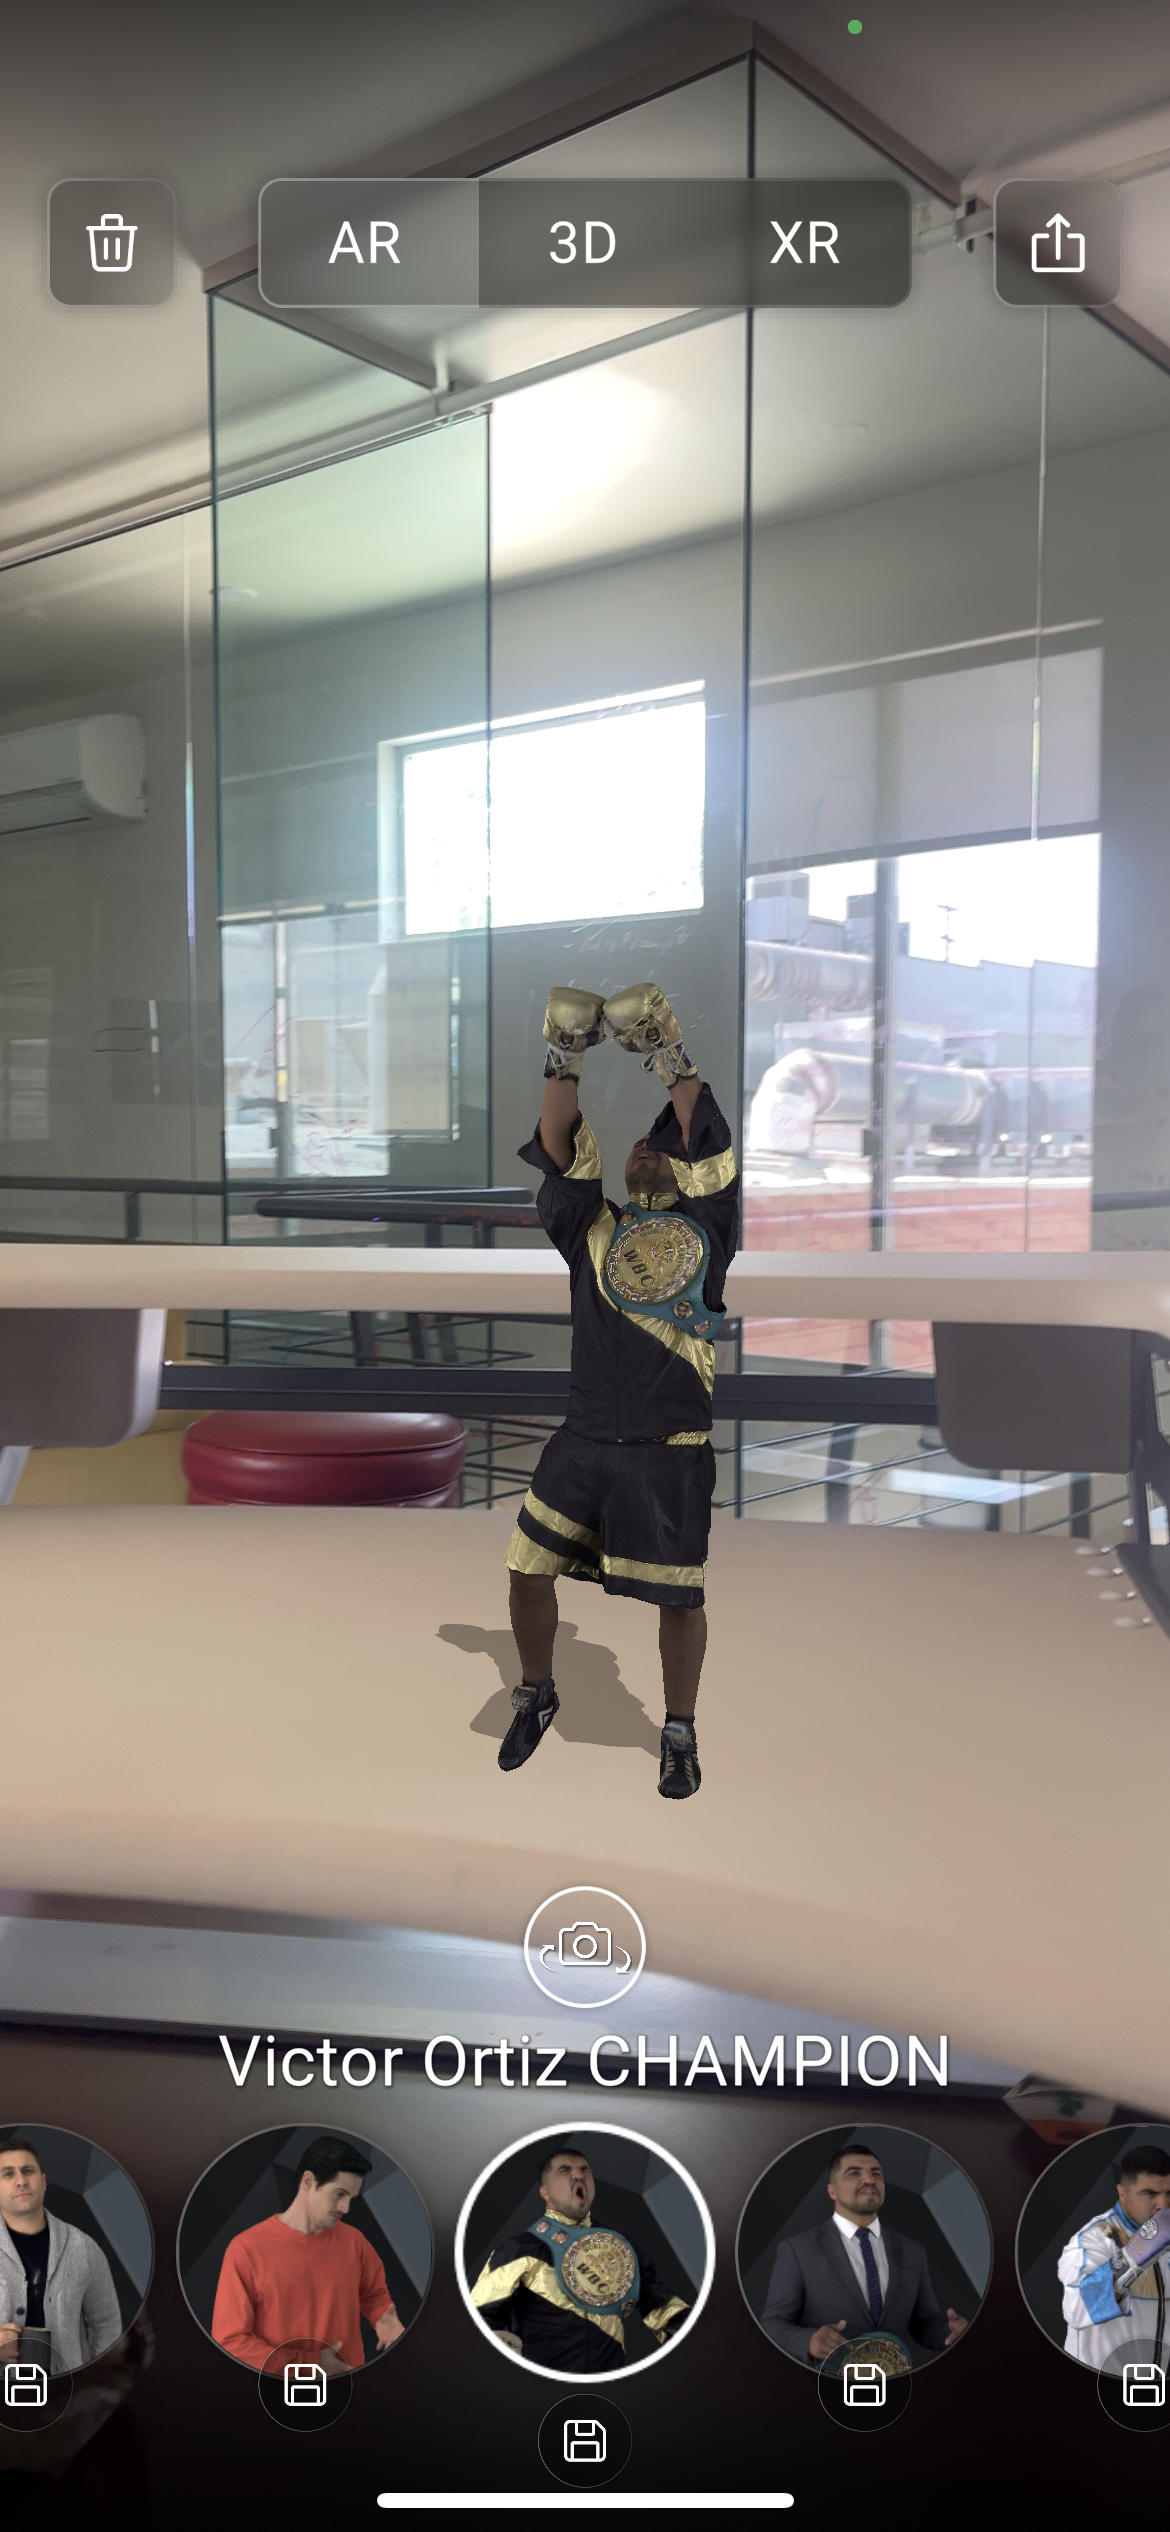
Switching Between Modes
You can freely move back and forth between AR, 3D, and XR modes and the subject will continue to be in the exact position you left it in the prior mode. To switch between modes, simply tap on the desired mode tab located at the top of your screen.

Switching Between Assets
Users can scroll between assets by swiping the circular thumbnails at the bottom of the screen. Asset names will appear above their thumbnail.
If your asset goes out of view, a blue line will appear on one of the sides of your screen. Depending on where your asset is, utilize the blue line to help steer you in the correct direction to relocate your asset.

Selfie Mode
Upon placing your subject in sight, the DNE app will activate your front-facing camera. To switch to selfie mode, tap the camera icon with two circular arrows (just above the asset’s name). Pressing the camera icon will flip your camera view to the front-facing camera. Then, turn around 180 degrees to view your subject behind you.
Taking Personalized Snapshots and Videos
Tap the circular button at the bottom center of your screen to take a photo. For video, press and hold the button. To end the video, release your finger from the circular button. Once a photo or video has been taken, you will be taken to a preview screen for sharing.
Sharing Content
To send your snapshot, tap the share icon on the bottom of your preview screen. To download your image or video to your photos app, select the download icon at the bottom of the preview screen.
*If you wish to delete a snapshot or video, simply click on the “X” at the top left of the preview screen.
Download to Get Started
PRIVACY POLICY
Last updated: October 13, 2023
Our policies and procedures on the collection, use and disclosure of your information when using the XR Studio App .We use your personal data to provide and improve our service. By using our service, you agree to the collection and use of information in accordance with this Privacy Policy.
Interpretation and Definitions
Interpretation
The following definitions shall have the same meaning regardless of whether they appear in singular or in plural.
Definition
For the purposes of this Privacy Policy:
- Account means a unique account created for You to access our Service or parts of our Service.
- Affiliate means an entity that controls, is controlled by or is under common control with a party, where “control” means ownership of 50% or more of the shares, equity interest or other securities entitled to vote for election of directors or other managing authority.
- Application refers to DNE XR Studio, the software program provided by the Company.
- Company (referred to as either “the Company”, “We”, “Us” or “Our” in this Agreement) refers to Digital Nation Entertainment llc, 1655 Euclid, Santa Monica.
- Country refers to: California, United States
- Device means any device that can access the Service such as a computer, a cellphone or a digital tablet.
- Personal Data is any information that relates to an identified or identifiable individual.
- Service refers to the Application.
- Service Provider means any natural or legal person who processes the data on behalf of the Company. It refers to third-party companies or individuals employed by the Company to facilitate the Service, to provide the Service on behalf of the Company, to perform services related to the Service or to assist the Company in analyzing how the Service is used.
- Usage Data refers to data collected automatically, either generated by the use of the Service or from the Service infrastructure itself (for example, the duration of a page visit).
- You means the individual accessing or using the Service, or the company, or other legal entity on behalf of which such individual is accessing or using the Service, as applicable.
Collecting and Using Your Personal Data
We collect data as described in the Daily Reports API documentation. This includes device information, IP addresses, app usage data, and potentially location data if users provide consent.
True Depth API Technologies
We use TrueDepth API technologies (ARKit, with automatic estimation of the real-world directional lighting environment) to create AR effects within the App. The only use of this information is to provide valuable user features. None of the information collected by the TrueDepth API ever leaves the user’s device. We do not share information with third parties, do not store or process in any other way the data which we accessed and used via TrueDepth API. For more information about TrueDepth API technologies, you may visit: https://support.apple.com/en-us/HT208108
To ensure the full functionality of this feature, our application requires permission to access your device’s front-facing camera. We value your privacy, and it is imperative to clarify that we do not collect, use, retain, or have any form of access to your personal data within our applications. You may be prompted to grant access to your device’s photo library, which serves the exclusive purpose of facilitating the storage of photos generated within the app. Our app has the capability to capture volumetric images and videos. Depending on a user’s decision, this content may be stored locally on your device’s camera roll, with no data processing on our part. However, it is essential to understand that we have no access to this data, and it remains private unless you opt to share the image. Importantly, none of the information collected by the TrueDepth API ever leaves your device, and it is not persistently stored on the device.
How We Use Your Information
We utilize the data collected through the Daily Reports Branch.IO SDK, as outlined in the Daily Reports API documentation. This includes purposes such as personalizing user experiences, improving app functionality, and generating analytics and reports. Your data is shared with third-party service Branch.IO. As described in the Daily Exports API documentation, we do not sell or track any of your personal information. We collect and process user data in accordance with our Privacy Policy, which includes data described in the Daily Exports API documentation. Usage Data may include information such as Your Device’s Internet Protocol address (e.g. IP address), browser type, browser version, the pages of our service that you visit, the time and date of your visit, the time spent on those pages, unique device identifiers and other diagnostic data.
Information Collected while Using the Application
While using Our Application, in order to provide features of Our Application, We may collect the following types of “other” data:
- Core Data- id, origin name, timestamp, timestamp_iso, event_timestamp store,_install_begin_timestamp, referrer_click_timestamp, days_from_install_to_opt_in days_from_last_attributed_touch_to_event hours_from_last_attributed_touch_to_event minutes_from_last_attributed_touch_to_event seconds_from_last_attributed_touch_to_event deep_linked first_event_for_user customer_event_alias di_match_click_token hash_version request_id match_guaranteed custom_data
- Last Attributed Touch: the most recent interaction or touchpoint that is credited with a specific action or conversion. It signifies the final marketing channel or user engagement that led to a desired outcome, such as an app installation, a purchase, or a specific event
- Last CTA View Data : data typically includes details about the CTA’s appearance, user engagement, and any associated events or actions, helping organizations analyze the performance and impact of their CTAs in influencing user behavior
- Event Data : information generated by user interactions or actions within a digital system, application, or website. These interactions or events can include user clicks, page views, purchases, sign-ups, and other user activities.
Retention of Your Personal Data
Branch.IO retains your Personal Data only for up to 7 days. After that period, we will no longer have access to exporting said data. We will retain and use your Personal Data to the extent necessary to comply with our legal obligations (for example, if we are required to retain your data to comply with applicable laws), resolve disputes, and enforce our legal agreements and policies.
The Company will also retain Usage Data for internal analysis purposes. Usage Data is generally retained for a shorter period of time, except when this data is used to strengthen the security or to improve the functionality of Our Service, or We are legally obligated to retain this data for longer time periods.
Transfer of Your Personal Data
Your information, including Personal Data, is processed at the Company’s operating offices and in any other places where the parties involved in the processing are located. It means that this information may be transferred to — and maintained on — computers located outside of Your state, province, country or other governmental jurisdiction where the data protection laws may differ than those from Your jurisdiction.
Your consent to this Privacy Policy followed by Your submission of such information represents Your agreement to that transfer.
The Company will take all steps reasonably necessary to ensure that Your data is treated securely and in accordance with this Privacy Policy and no transfer of Your Personal Data will take place to an organization or a country unless there are adequate controls in place including the security of Your data and other personal information.
Delete Your Personal Data
You have the right to delete or request that We assist in deleting the Personal Data that We have collected about You.
Our Service may give You the ability to delete certain information about You from within the Service.
Users can also choose to turn off data collection (See: https://help.branch.io/developers-hub/docs/honoring-opt-out-of-processing-requests)
Please note, however, that We may need to retain certain information when we have a legal obligation or lawful basis to do so.
Law enforcement
Under certain circumstances, the Company may be required to disclose Your Personal Data if required to do so by law or in response to valid requests by public authorities (e.g. a court or a government agency).
Other legal requirements
The Company may disclose Your Personal Data in the good faith belief that such action is necessary to:
- Comply with a legal obligation
- Protect and defend the rights or property of the Company
- Prevent or investigate possible wrongdoing in connection with the Service
- Protect the personal safety of Users of the Service or the public
- Protect against legal liability
Security of Your Personal Data
The security of Your Personal Data is important to Us, but remember that no method of transmission over the Internet, or method of electronic storage is 100% secure. While we strive to use commercially acceptable means to protect Your Personal Data, We cannot guarantee its absolute security.
For additional information visit the Branch Privacy Policy Page
Changes to this Privacy Policy
We may update Our Privacy Policy from time to time. We will notify You of any changes by posting the new Privacy Policy on this page.
We will let You know via email and/or a prominent notice on Our Service, prior to the change becoming effective and update the “Last updated” date at the top of this Privacy Policy.
You are advised to review this Privacy Policy periodically for any changes. Changes to this Privacy Policy are effective when they are posted on this page.
Contact Us
If you have any questions about this Privacy Policy, You can contact us:
- By email: [email protected]
We promise we don’t send spam